National Bath Safety Month 2019

NAtional Bath Safety Month

Keeping You and Your Duckies Safe

January is National Bath Safety Month! Here are some tips for preventing bath related injuries:

  • Prevent slips and falls with an anti-slip mat.
  • Grab bars are wise choice for the young and old alike – shower doors and towel racks are not strong enough to prevent slips!
  • Scalds are burns caused by hot liquids or steam – make sure your tub/shower has a pressure balanced valve (remember in the movies when they flush the toilet and the person in the shower screams? This prevents that).
  • Scald guards can automatically shut off the water if it is too hot – further preventing scalds.
  • Check your shower and tub for sharp edges.
  • Test the water temperature before showering or bathing.
  • Keep toiletries within arms reach to prevent slips from over extending yourself.
  • Fill the tub before entering and check the water temperature before entering or placing some one else in the bath.

Stay Safe!

Getting to Know Your Water Well – Maintenance Tips to Save You Money

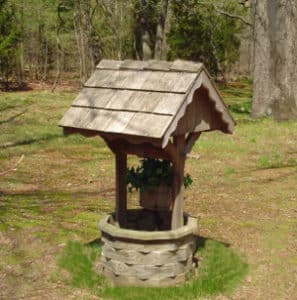
old_timey_well2 For many of us, we turn on the faucet, flush the toilet, or take a shower without considering where exactly our clean, potable water comes from. A national average shows that about 90% of the nation’s public water systems use groundwater, or commonly known as a well water. Even if you don’t own your own well, there is a good chance the water you use every day comes from a well. For example, residents in the city of Chico get their water from a system of over 60 wells and almost one third of Redding’s water supply comes from ground water wells! But how does a well work? And how do you maintain your well? Earl’s Plumbing is here to help you out with “Getting to know your Well”!

Water Well Basics

Your well is essentially an access port to an Aquifer: a saturated, porous geological formation. As precipitation and surface water flows percolate through the soil, it reaches a point where all the pores in the ground are filled and gravity ceases to pull it any deeper. This is called the water table, and is the water source for your well.

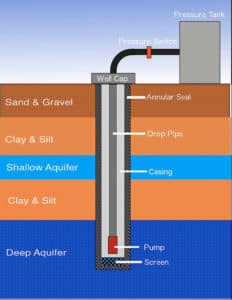
well_anatomy Anatomy of a Well

  • Casing -The Casing is a tube placed within the bore of the well. Its purpose is to prevent the bore from collapsing, and prevent contaminates from mixing with the water.
  • Annular Seal -The material between the borehole and casing, used to keep surface water and other contaminates out of the well.
  • Pump- The pump is the heart of the well. They come in two main styles – jet pump and submersible. The jet pump sits atop the well and uses suction to pull the water from the well. Most jet pumps require water to work and thus must be primed before operation. Submersible pumps sit at the bottom of the well, and through a series of impellers, push the water out of the well
  • Screen -A screen may be affixed to filter out excessive sediment from entering the well. They are usually attached to the bottom of the casing.
  • Well Cap- The well cap covers the top of the well and prevents surface water and other contaminates from entering through the top. Typically extended 6-8 inches above the ground, and have a vent to allow for equalization of pressure when the well is being pumped.
  • Drop Pipe – The drop pipe is the delivery pipe for the water. When a submersible pump is used, it is affixed to the bottom of the drop pipe.
  • Pressure Tank – The pressure tank allows for storage of water under pressure, so that when you turn on your faucet, you are not relying on your pump to provide the supply of water. This allows your pump to cycle less frequently, thus extending it’s life, and saving your wallet.
  • Pressure Switch – The pressure switch is what monitors the pressure in your water system and is responsible for signaling the pump to turn on.

Well Maintenance

The first step in maintaining your water well is to have an annual inspection performed by a qualified professional, like Earl’s Plumbing. A properly maintained well will last you and your family for decades to come, and can save you money in the long run in costly repairs.

What Should Be Checked?

  • Flow test, checking the level of the well before and during pump operation
  • Check Pump Motor Performance, including amperage draw
  • Inspect and test Pressure Switch
  • Visual inspection of Well Cap
  • Inspect Control Box & Wiring
  • Inspect Pressure Tank/Bladder Tank if applicable
  • Water Quality Test including testing for Bacteria (Coliform Bacteria), pH Test, and other applicable screenings for your area
  • Detailed report of general state of the well, as well as any needed repairs to the system

Other Tips For Maintaining Your Well

In conjunction with your annual Well Inspection, you should keep all hazardous materials away from your well. These include fertilizers, paints, oils, pesticides, etc. Also, periodically visually inspect your well cap for cracks, proper fit, and any signs of tampering. Be attentive to any changes in the behavior of your well. Is the water cloudy? Does it have an odor or odd taste that wasn’t there before? These are all signs that their might be an issue with your well. But be sure to have the quality of your water tested annually as many forms of contamination will not show up visibly or give you water an odor or taste.

Another aspect to maintaining your well is accurate keeping accurate well logs. Keeping track of the findings of your annual check ups and water quality reports can give vital insights into the health of your well and help prevent costly repairs in the future. If you do not already have a copy and are the owner of the well, you can request a copy of the Well Completion Form from the State of California Department of Water Resources, which will have useful information from when the well was constructed and registered with the state.
Finally, if your well has reached the end of its useful life, properly handle the abandonment of your well according to local and state regulations, as this can be a source of contamination of the water table, as well as a danger to the public and wildlife.

Understand Your Wells Problem

Hopefully this brief overview gives you some insight into the inner workings of your well. But if a problem does arise give us a call, and more importantly, don’t be afraid to ask questions! There are many varying factors as to why your well might not be performing as expected. For example, if the yield of your well has decreased, it may be due to a drop in the water table. Other times it may be due to a clog in the well casing or mineral encrustation on the screen, or perhaps the state of your pump might be in disrepair. Being informed and confident is essential when moving forward with repairs, and as always, Earl’s Plumbing is here to get any issues with your well Fixed Right, Right Now.

Water Well Resources

There’s a hole in Whiskeytown Lake, and why that is a good thing.

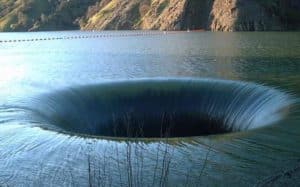
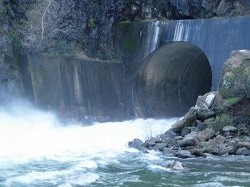
kennedy_at_whiskeytown_lake_1 I guess to say a “There is a hole in Whiskeytown Lake” is a stretch. The correct term would be a drain, and not just any drain, one of the biggest drains in the world, right here in our “backyard”. Not to worry though, this drain was built to control the level of Whiskeytown lake when the reservoir gets too high, but viewing one of these drain in action gives the eerie feeling that there is a giant hole in the bottom of the lake.

Located about 6 miles West of Redding, Whiskeytown Lake, like many other man-made reservoirs that are scattered throughout our region here in Northern California, was one of the projects carried out by the United States Bureau of Reclamation. Construction was completed in 1963 and the reservoir began filling, and in September of that year, President John F. Kennedy came out to dedicate the reservoir in front of a crowd of more than 10,000. The goal of this reservoir, much like the other reservoirs constructed around this time, was to control flooding in the Northern California valley, as well as provide a constant supply of water for irrigation, and the generation of electricity. kennedy_at_whiskeytown_lake_2

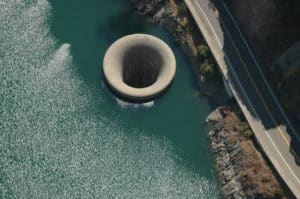
Engineers at the United States Bureau of Reclamation had many design options when it came to the task of controlling these reservoirs from overflowing. Essentially they needed a drain, and a common design utilized was the inverted bell spillway. This design allows for the level of the lake to control itself, without the need of human oversight to run a gate or valve. Whiskeytown is not the only reservoir in Northern California to utilize this ominous looking inverted bell style drain for overflow protection, Trinity and Lake Almanor also make use of this style. But what makes it really interesting is Whiskeytown lake, along with another Northern-California man made lake, are in the top 5 of the largest drains in the world! Just a short drive south to Lake Berryessa outside of Napa, at the Monticello Dam, you can view the worlds biggest drain.
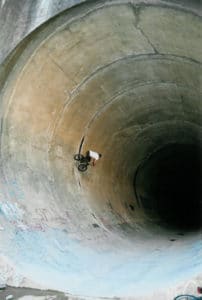
DV IMAGE The Monticello Dam was constructed between 1953 and 1957, and impounded Putah Creek, creating what we know now as Lake Berryessa. The inverted spillway, or “morning glory” is considered to be the largest drain in the world, with an opening of 72 feet, and an outlet of 28 feet. When the reservoir is at capacity, the “morning glory” spillway can empty up to 362,000 gallons of water per second! monticello_spillway_birds_eye
Let us put that into perspective. 362,000 gallons per second equals almost 22 million gallons per minute. A typical shower head runs at about 2.5 gallons per minute, and a low flow version runs about 1.5 gallons per minute. But what does that look like? Well, at that rate, it would empty an Olympic size pool in under two seconds! For comparison, it would take the drain at Whiskeytown a little longer, clocking in at about 4 seconds.

These reservoirs, which provide us with much needed flood control, electricity generation, and water for irrigation, also give us a second added benefit: recreation. Whiskeytown Lake offers an immense amount of outdoor recreation, including boating, fishing, water skiing, and swimming, and the beautiful surrounding wilderness is great for camping and hiking. So get out there and enjoy what this modern marvel of plumbing and engineering has created!

monticello_drain_running

monticello_drain

More Information

A leading insurance company is warning that your washing machine hoses should be replaced every 5 years…why is this? (Click here to learn more)

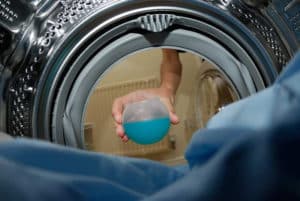
washing_machine Have you ever wanted a swimming pool where your washing machine is? We didn’t think so, and neither do the folks over at State Farm Insurance. Your washing machine lines carry 70 pounds of pressure, and when it fails, can dump up to 650 gallons per hour! Damages are estimated to be upwards of $170 million per year due to washing machine supply line failures for US and Canadian households, according to recent State Farm Insurance statistics. Follow these tips and save yourself the money and hassle of that ruptured supply line before it is too late.

Replace Those Hoses Today

Often overlooked, the hoses that supply the clean hot and cold water to your washing machine have a limited life expectancy, and must be replaced every 3-5 years to prevent water damage to your home. Although the hoses may appear fine on the outside, deterioration can occur on the inside lining, where you cannot see the signs of an impeding failure.

Why Do They Fail?

The most common failure is simply due to age. The rubber over time loses its resiliency, making it susceptible to cracks, leaks, and bursting. Installation errors also account for a large number of failures, mainly by not leaving an ample amount of room behind the washer to prevent the hoses from kinking and shortening their lifespan. Manufacturer defects, such as kinks, crimps, and blockages can also shorten the life expectancy of your washing machine’s supply lines.

How you can help prevent a disaster today

Although replacing the supply lines at the recommended interval of every 3 to 5 years is key to preventing water damage to your home, regular inspections are vital. Inspect both the hot and cold supply lines at least once a month, ensuring that there are no kinks or bends in the lines and the washer is at least 4 inches from the wall. Regularly check the condition and operation of the control valves, and get rid of those old, hard to operate screw type valves in favor a newer ball style valve. Remember, never operate your washing machine (or other major appliance) when not home, and shut off those control valves when not in use, especially when you go on vacation or will be away for any extended period of time. Remember that 650 gallons per hour? Over the course of just 30 hours you could fill an average size swimming pool!

If you see any of these warning signs, contact us today for a free in home inspection

Any sign of wear should be a red flag that you need to get your lines replaced. Common indicators are blisters, stress cracks, loose connections, bubbling, discoloration, or worn tubing. Loose connections should be inspected and tightened, but take care not to over tighten, as this can damage your hoses and connections and severely shorten their lifespan. If in doubt, contact us to come out for a free inspection.

Adjust Your Mind

Adjust your thinking from “fix” to “prevent”. That is, if you’ll adjust your mindset from “Fix what just broke” to “Prevent it from breaking”, it’ll save you money, time and headaches. It’ll also probably save you from a panicky sloppy mess someday too! Believe us, we’ve seen repairs…

that cost thousands of dollars to fix because a hose failed.

So follow these tips to keep your floors dry and your mind at ease, and as always, call us to get your plumbing problem fixed right, right now!
Fix It or Nix It? – Weighing Repairs vs Replacements

noritz_tankless_water_heaterEmergency home repairs are hard enough to deal with, making last minute decisions more difficult and potentially costly in the long run. One of the most frequent questions we get asked is “Is my _______ worth repairing or do I need a new one?” To help answer this question, we’ve compiled a quick list of things you should look out for when weighing the pros and cons of replacing a system component, such as your water heater or sewer line. This advice isn’t only restricted to plumbing either – any home repairs should be thought out with the same careful judgment.

Cost of repairing compared to cost of replacement.

This is usually the first thing on your mind when handling a major home emergency. When all is said it done, repairing isn’t always the cheapest solution. If it’s going to be a temporary fix until the next failure, then maybe it’s time to look at replacing that item. As a general rule of thumb if the cost to repair is at least half the cost of replacing, then replacing is probably the best route. Your decision should also take into consideration the age of the item in question. Is this system component obsolete? If so, making any further investments into maintaining it might be a waste of money.

Relative age of appliance or system component.

There’s more to consider than simply “is this ______ old?” The age of your water heater might not seem like a crucial factor, but when you consider advances in technology related to efficiency and safety, comparing new to old becomes less cut and dry. Newer models take advantage of breakthroughs in machining, manufacturing, and nanotechnology to lower energy bills and increase longevity of appliances. A great example is heat pump technology that uses ambient heat in the air to preheat the water in your water heater for increased efficiency. Another example is tankless water heaters that are designed to be modular, meaning parts are easily replaced instead of replacing the entire unit.

Planned replacements.

According to the Air-Conditioning, Heating, and Refrigeration Institute (AHRI), “about 90% of water heater replacements are of an emergency nature.” Water heaters also have a large capacity to cause secondary damage to your home, so it’s important to be mindful of the age and condition of your water heater. The typical life expectancy of a water heater is 10-15 years, so once you’ve crossed that threshold you should begin serious planning for a replacement unit. This goes for any major component of your plumbing or other home system. When planning for replacements, it’s always good to research the latest technology trends and find a more efficient model with an increased lifetime.

If you have questions about the age or condition of your plumbing system, don’t hesitate to call or send us a message to schedule a free in-home evaluation and recommendations for upgrading your plumbing before it becomes a problem.

Seven Simple Tips for a Successful Exercise Routine

Maybe your New Year’s resolution was to lose some extra weight. Maybe you just want to get back in shape and tone your body. Or maybe you feel the warmth coming back as spring approaches and you’re just dying to get outside! Either way, you won’t want to miss these simple tips to keep you on track to being healthy! We’re seven weeks into the 2013, so we came up with seven simple tips to keeping a successful exercise routine throughout the entire year.

1. Be Consistent

If you take away only one piece of information from this article, let this be it. When it comes to losing weight, getting in shape, or staying healthy, the key is consistency. Come up with a routine and stick to it, even if it’s just a weekly jog around the block. The only way to ensure success is to be dedicated to your workout schedule.

2. Exercise in Segments

Break up your workout throughout the day. Try exercising for 30 minutes of exercise in the morning, 10 minutes before lunch, and then 20 minutes in the evening. This will give you more flexibility in your schedule as well as making work out sessions more bearable.

3. Gradually Build Up Your Routine

It’s always best to start a new exercise routine slowly and gradually add more into your routine over time. This will reduce soreness and risk of injury. Start with a 10 minute workout and add 5 minutes each week until you’ve reached your goal.

4. Workout with a Friend

This is a great way to help boost your confidence when starting a new exercise routine. Finding the right person will help you stay on track with your workouts and keep you motivated to follow through.

5. Do Something You Enjoy

Let’s face it – starting a new workout routine isn’t easy, so why not get active doing something you love? Dancing, swimming, bicycling, your favorite outdoor sport, you name it! All these things and more are excellent ways to move your body and get yourself feeling good AND have fun doing it.

6. Focus on Goals and Reward Yourself

Set aside realistic goals and reward yourself for reaching them! This can be as simple as doing your routine every day for a month or walking a certain amount of steps in a single day (a pedometer will help with that). Make sure you reward yourself with something healthful, like a nutritious treat or a new piece of workout equipment.

7. Drink Plenty of Water and Eat Right

All that exercise won’t help if you don’t have the right fuel – and in fact can have negative effects. Take some time to evaluate your diet. You may need to add more protein and non-wheat carbohydrates to help your body stay energized and repair itself from the workout.

That’s all for now. Stay motivated and don’t give up. It gets much easier after a couple solid weeks of consistent, well planned exercise.